March 11, 2024
How do you assemble a night vision device yourself?
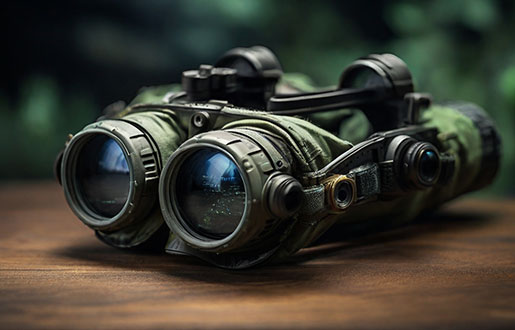
The night vision device is one of the most valuable inventions made in the last 100 years. It allows a person to see generally in conditions of minimal illumination and to perform various works in the dark. There are many types and models of such optics, the most expensive. In this regard, low-income people must collect NVD independently from items available to everyone. Most often, this process is not only simple but also exciting. It requires a minimum of components and tools to carry out the work. You will learn from our guide how exactly you can assemble a homemade night vision device that will work like a real one.
Operating principle of night vision devices
Relatively recently, people learned to see in the dark. The night vision devices they created became a revolutionary invention that opened up new possibilities for humanity. Gradually, such optics were improved. The changes affected the design and various aspects of the work. As a result, engineers were able to obtain universal and multifunctional models that are available today. Despite all the metamorphoses, the general principle of operation of night optics has remained unchanged.
All models of night vision devices are divided into passive and active. The first ones work on the principle of a light amplifier. They collect all available light radiation that comes from surrounding objects. Its further transformation in a unique electron-optical converter leads to the formation of an image that the human eye can discern. Passive-type devices can only work with at least a little light. It can come from various celestial bodies or distant sources of artificial light. Because of this feature, models of this type are useless in complete darkness. Active devices use infrared radiation, which illuminates the part of the territory that they want to view. LEDs, lasers, or infrared spotlights form it. Active-type models can work effectively thanks to infrared radiation, even without lighting. Moreover, unlike passive ones, they unmask the user.
Having analyzed in detail all the pros and cons of both types of devices, we can conclude that they will be helpful only in some instances. Therefore, before assembling night optics, you must accurately determine their purpose. By the way, it’s easier to make active-type models with your own hands. They require fewer components; therefore, in most cases, they assemble just such devices.
Methods for self-assembly of the device
You can find hundreds of ways to make a night vision device from various available Internet materials and specialized literature. Each of them has pros and cons, but with the right approach to business, they all make it possible to achieve the desired result quickly. In our article, we have collected the most popular methods for making night optics yourself, which allow you to get something like a full-fledged NVD in a couple of hours.
From ready-made modules
The easiest way to assemble a night vision device is to use ready-made modules. They are purchased separately in specialized stores and connected to each other through simple and understandable manipulations. Depending on the quality and characteristics of the purchased components, it will be possible to obtain night optics with specific capabilities, making them an ideal option for performing a particular job. The image produced by such homemade night vision devices is relatively good quality, but they still need to be closer to the assembled models.
Required items:
- inexpensive compact monocular;
- mini camera;
- charging module (step-down converter);
- Three batteries (3.7 V each);
- plastic panels (to create the device body);
- mini switch;
- connecting wires;
- glue for plastic;
- hot melt adhesive;
- electrical tape.
Procedure:
1. You begin work by making the body of the future night vision device. To do this, take plastic panels, from which you cut out all the details of such a product with a stationery knife. To fasten them together, use a special glue for plastic. It dries quickly and firmly connects the workpieces. The case size is selected depending on the dimensions of the purchased components. The resulting structure should be divided into two parts. One will be the base, and the other will be the lid.
2. Using a utility knife or other sharper objects, cut several holes in the body. One is necessary for installing and connecting the charging module, and the second is for installing a mini-switch.
3. Glue the step-down converter to the inner wall of the manufactured case. This is best done using hot melt glue. The mini-camera is mounted in the same way. It is best located close to the charging module to avoid the need for long connecting wires. On the opposite side, install a compact monocular.
4. At the next stage, you begin working with batteries. They need to be connected in parallel to obtain a single structure. It is also glued to the case's inside but installed on its second half (lid).
5. After completing the installation of all components, connect them with wires. This must be done so that the voltage from the batteries first flows to the step-down converter. It will reduce the voltage to 5V, which is needed for the mini camera and monocular.
6. Cover the exposed parts of the connecting wires with a layer of electrical tape. Re-check the correctness of the installation, and then align the base and housing cover with each other. To fix them, you can use hot melt glue or small-diameter screws.
7. Go to a poorly lit street at night to check the device's functionality. Please turn on your homemade night vision device and point it at an object. The assembly is done correctly if it is clearly visible in the moonlight.
From an old smartphone or iPhone
This is one of the most exciting ways to make your night vision device. It involves the need to use an old smartphone or iPhone, which has been gathering dust in your closet for a long time and is unlikely to help perform its direct tasks. You will need only 2-3 hours of free time and a minimum of materials to carry out the work. All of them are relatively inexpensive and available in every locality. The finished device will work effectively even in complete darkness. Its only drawback will be the need to use it from a short distance (no more than 0.5 meters). However, it will be suitable for most simple tasks and can partially replace expensive night optics.
Required items:
- Old smartphone or iPhone;
- Three batteries or accumulator (voltage 12 V);
- 5 IR LEDs (can be taken from old TV or DVD player remote controls);
- Five resistors (270 Ohm);
- connecting wires;
- mini switch;
- electrical tape;
- hot melt adhesive;
- several sheets of cardboard.
Procedure:
1. First of all, you make the body of the future device. To do this, use cardboard and hot glue to create something like a box (the size should be approximately equal to the dimensions of a smartphone or iPhone). Make a rectangular cutout in one of the corners of the lower part of such a case that will give the camera access to light. You also make a hole in the side of the cardboard case to connect the switch.
2. Place your smartphone or iPhone into the case, pointing the camera at the rectangular cutout in one of the corners. Step back from the edge by 0.2-0.4 inches (depending on the thickness of the gadget), and glue it in a partition made of the same cardboard. It will serve as a lock and will prevent the mobile device from accidentally falling to the floor.
3. Connect three batteries in series, making a tap for the switch from the wires. If you use a battery (12 V), perform only the second of the listed operations. In both cases, you place the batteries in a previously manufactured case.
4. Attach the switch to the side. You connect the leads from the batteries to it and output two additional wires for lighting. At this stage, you can check. When you press the switch button, 12 V voltage should be supplied to the wiring.
5. At the next stage, take IR LEDs. They can be purchased separately or removed from unnecessary remote controls. Before connecting them, install resistors with a resistance of 270 Ohms. Next, take out one wire, which will be used to communicate with the batteries.
6. Connect the IR illuminator to the device. Cover all exposed wires with a layer of electrical tape, then glue the case's back cover. Next, go into a dark room and turn on the camera of your smartphone or iPhone. Use the installed switch to activate the IR illumination. If, after this, a picture appears on the display in which you can see nearby objects, then the work has been completed successfully.
From an old video camera
This self-assembly method makes obtaining the most compact night vision device possible. It will be simple and easy to use, so it can help you cope with various tasks in the dark. It is essential to consider that ideal image quality, such as sold NVDs, cannot be achieved. In assembling such optics, an old video camera, or its module, will be used. It must first be removed from the device to speed up and simplify further work as much as possible. This is quite simple, so even a beginner can handle this task.
Required items:
- Video camera module (sensitivity no more than 0.008 lux);
- IR illuminator (must include 30 or more LEDs);
- mini TFT screen (diagonal no more than 3.5 inches);
- battery (12 V);
- voltage reduction device (from the original 12 V to 5 V);
- RCA adapter;
- Two switches;
- Three plastic boxes of different sizes (2 of them should fit in the third);
- connecting wires;
- electrical tape.
Procedure:
1. Start the assembly by connecting the mini TFT screen and IR illuminator to the battery. The latter is placed in a plastic box of a suitable size, which will protect the batteries from any external influences.
2. Install switches. One will be responsible for activating and deactivating the entire device, and the other will turn the IR illuminator on/off. The second switch may not be used, but it will make controlling the night vision device much more convenient. It will also help save battery power when homemade night optics are not used (you can turn off the IR illuminator after inspecting objects in the dark and turn it on again to obtain an image on the screen).
3. The old video camera module is installed in the circuit in the next stage. It is connected to the power source through a voltage reduction device. Reducing the original 12 V to an acceptable 5 V for the video camera module is necessary. To integrate such a device into a circuit, connect its input to the battery and its output to the positive power supply of the module. In this case, connect the negative tap to the negative terminal on the batteries. Connect the video signal output from the video camera module to the screen input using an RCA adapter. Cover all exposed connecting wires with a layer of electrical tape.
4. Place the video camera module and IR illuminator in a plastic box of a suitable size. Before doing this, make holes for the camera eye, IR illumination, and switch output.
5. Place a mini TFT screen (front side to the bottom) in the last remaining plastic container (the largest one). At the bottom of the box, you make a cutout slightly smaller than the dimensions of the display. We also made several holes in the cover (to bring out the camera eye and IR illuminator). Fill the remaining space with two other boxes with various components.
6. After carefully fixing all components, proceed to testing. To do this, go into a dark room and turn on the device. Use the switch to activate the IR illuminator. Point the camera's eye at the object of interest, after which its image instantly appears on the display. If it is visible, then the job is done perfectly.
From an unnecessary camera
This method makes it possible to assemble a night vision device with your hands from a digital camera you last used for taking photos a long time ago. It is simple and understandable, but to carry it out, you will need maximum care when performing each action. If you make a mistake, you can easily damage various camera components, after which it will stop working forever. However, if done correctly, you will have a night optic suitable for many simple tasks. Its only drawback is that the image quality could be better than sold models. However, the result obtained for a homemade device will be pretty good. In the generated image, it will be possible to distinguish all nearby objects and examine some of their details.
Required items:
- digital camera;
- IR LEDs;
- step-down voltage converter;
- cooling radiators (for LEDs);
- 2 AA batteries (1.5 V each);
- hot melt adhesive;
- switch;
- connecting wires;
- electrical tape.
Procedure:
1. First of all, disassemble the digital camera and remove the IR filter. To do this, unscrew all the screws and carefully remove the back cover. Do this slowly so as not to damage the device's internal parts accidentally. Next, remove the camera display and dismantle the frame that holds it. Remove the cables that open after removing the display from the connectors. Also unfasten the front cover of the camera. Then, remove all the wiring going to the microphone and the high-voltage capacitor for the flash. You unscrew the matrix board and finally get to the IR filter. It is covered with a unique polymer frame, which you carefully remove. Only then can the IR filter with tweezers.
2. Instead of the IR filter, place a piece of transparent material (for example, a protective film for a phone screen) at the next stage. This must be done, as otherwise, the camera will lose its ability to focus on various objects automatically.
3. Having secured the transparent analog of the IR filter, assemble the camera. To do this, perform the previously described steps in reverse order. At the end of this work, check the device for functionality.
4. If everything functions perfectly, then proceed to install the LEDs. You place them on the cooling radiator boards, not forgetting to make outlet contacts. Also, use a step-down voltage converter, which you connect to the batteries at this stage.
5. Solder the LEDs to the contacts on the cooling radiator boards and make a small hole in the camera body for the switch.
6. Attach the LEDs to the front panel of the device. Connect them all in series, remembering to route the contacts to the step-down voltage converter. Connect the connections from the device control board there. They must go through the switch that will be used to activate/deactivate the IR illumination.
7. Cover all exposed parts of the wires with a layer of electrical tape. Various structural elements added during the camera's modernization are hidden in the body of the device. If their dimensions do not allow this, attach everything to the side parts of the case using a hot-melt adhesive.
Go into a dark room, turn on the camera, and press the switch button that activates the IR illumination. The job has been completed successfully if a clearly visible image appears on the display.
From a cheap action camera
This method is interesting because it makes it possible to create a relatively compact homemade night vision device. It will work effectively from a short distance, creating a visible image even in complete darkness. Naturally, the picture quality will be lower than sold NVDs, but it will be suitable for simple tasks. During the assembly process, using any budget action camera in which the user can independently change the settings is enough. You will also need a lens for VR glasses, which can be purchased online or in any specialized store. Its cost will always be low, so a ready-made night vision device will be cheap.
Required items:
- inexpensive action camera;
- flashlight (with IR LED);
- lens for VR glasses;
- safety glasses made of plastic (intended for construction work);
- PVC tube and various accessories to it (collar, clips, etc.);
- a small piece of PVC sheet;
- glue for plastic.
Procedure:
1. Please turn on the action camera and change its settings. In particular, it increases exposure and deactivates automatic display shutdown.
2. Take a plastic bottle painted black. Cut off the neck and also unscrew the lid. In the latter, you cut off the bottom so that you can fix the lens for VR glasses in it. Carefully tighten the cap and check the result.
3. Next, you create the body of the future night vision device from a piece of PVC sheet. It should be such that the action camera you are using fits inside. In the front part of the case, make a cutout according to the size of the device’s display. Using glue, attach the neck of a plastic bottle (with a lens for VR glasses installed) to the resulting structure.
4. Make a hole in safety construction glasses (in the place that will be located in front of one of the user’s eyes) corresponding to the size of the PVC pipe collar. Do this as carefully as possible since plastic manufacturing such glasses can crack from careless movement.
5. Insert the PVC tube collar into the prepared hole and fix it with glue. Next, attach the PVC clips needed to install the flashlight to the side of the glasses (place them on the side opposite the camera lens).
6. Install a PVC tube of the required length into the collar at the final stage. Next, attach the neck of the bottle with a lens for VR glasses and mount a flashlight with an IR LED.
7. Go into a dark room and turn on the IR flashlight and action camera. Put on glasses to which the listed structural elements are attached. You can distinguish surrounding objects, even in complete darkness, if everything is done correctly.
Nowadays, it isn't easy to imagine life without night optics. It is used everywhere and benefits representatives of various professions. The main problem with such devices, which scares many potential buyers, is their inflated cost. Because of this, many people prefer to assemble night vision devices with their own hands. This process does not require special knowledge and skills; all work on creating night optics comes down to performing a few simple steps. If you choose everything you need correctly and strictly follow the instructions, you can get a cheap but effective NVD in a couple of hours.